Mercury Cougar Owners banner

Rear Seat to Trunk Divider

2 reading
12K views 17 replies 9 participants last post by  sfeddie46  
#1 ·
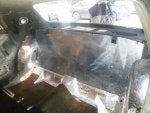
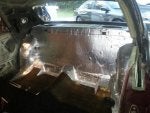
Any of you get this one in metal and install it? I am trying to install it but am finding it a bit too wide. Anyone else? If you happen to have any photos of the installation I would appreciate it. Thanks BTW I got my new opera light fixtures and installed new bulbs. What a difference. Its like daylight in the car. I think I am going to change the bulbs to LEDs to prevent heat damage like the old ones.
 
#3 ·
Many threads address this subject....
 
#4 ·
#5 ·
that is a awsome thread, and i think i should pick up the stringers and jacking rails from work for the 69 , we do offer them as well!
 
#6 ·
I was looking for safety and sound deadening. Not worried about torsion or rigidity although if I install it properly it may accomplish both. Got it in today along with the new tray package I made and it looks good. Now for the cloth to cover the tray package. I tried punching the package with a punch to make the speaker holes. Does not work. I wound up doing them with a drill then sanding the holes lightly after I finished to get the effect I wanted. Came out great.
 
#7 ·
Now for the cloth to cover the tray package. I tried punching the package with a punch to make the speaker holes. Does not work. I wound up doing them with a drill then sanding the holes lightly after I finished to get the effect I wanted. Came out great.
I used a piece of graph paper taped to the back of the package tray to drill out undersized holes with a Dremel set to fairly high speed. I then back drilled from the top side and opened up the holes to full size. Finished it off with satin black paint.
http://www.mercurycougar.net/galler...ar.net/gallery/showphoto.php/photo/9910/title/packag-tray-speaker-holes/cat/500
 
#8 ·
That looks great but OMG does that look like a lot of work. I have to do one for the Cougar and one for the 72 Mustang. I am not looking forward to that many holes. Oh well. Lets see how it goes. I do not want to add cloth either if I can help it. Is there anyway to adjust that molding on the back of the tray? Mine is down a bit on the drivers side.
 
#9 ·
For "Safety"? The exploding fuel tank thing? You're gonna have to seal up a lot of openings back there.
 
#10 ·
I am going to seal up everything but that is not all. I am removing the bolts from the tank and installing bolts with locking nuts and washers. I am also sealing with sound deadener and using bolts with nuts on the divider. The thing is I have 6x9s under the package tray and 2 10" woofers going thru the center of the divider so I do not know how safe that will make it but I am sure that with all of the deadener and the divider it will be much safer than it was and for sure quieter. Does anyone know how to adjust that molding on the back of the package tray.
 
#11 ·
I just installed the metal trunk divider on my 69. It did not fit in width by about 1/4 inch on each side at the wheel well flange. A little trimming and I was able to screw it in place. Like DXR7_67, I covered that with dynomat to seal it up and cut the sound down. It took about an hour in all to install and cover in all.

Rich
 
#17 ·
Don, just a note, I made one from the paper template I bought from WCCC and it is also too wide, but like everyone else, a bit of trimming and it worked fine, although I made mine out of thicker gauge steel than what is being sold on the market. I was surprised how much these cars twist out of shape and I'm glad I'm doing this now with the ground up restoration before final body work etc. These seem to add a lot more support to the car's structure, I'd say almost a must for this rather than a safety item.
 
#13 ·
Yes Don, it was one of yours. I noticed that the cut out on one side for the wheel well did not look like a smooth transition unlike the other. the straight cut going to the floor from the curve at the top was not straight but bowed out hitting the wheel well. Once I trimmed that about 1/4 inch, the panel fit but was a little off center and overall almost interference tight. To get the panel to center properly, I just trimmed it about 1/8 inch off the opposite side and it fit right in and centered. I did not think that much of it since this car, though being from Arizona and only having one minor fender bender (found after the car was media blasted) has been a little off in dimensions all over. No big deal and much preferred over the old tar paper backing.
 
#14 ·
Good feedback, I will have the guys test fit it on a dozen cars tomorrow like we did when we first had them made. Patterns can wear, suppliers can get sloppy among other variables. Really helps to get feedback, often we only get good feedback on our rating system on our site and often I shake my head at some items that get 5 stars as I have used the same item and would not give it a 5...
 
#15 ·
don mine is still in the box, i have not test fit it yet either , i will let you know
 
#16 ·
Yes, mine was also a 1/4 too big on the bottom sides. I trimmed a 1/4" off of both sides about 6" high with a cutting wheel. Took about 3 minutes, then filed everything smooth. It fit perfectly. Not a problem at all. I got mine from WCCC also. I gave it 5 stars because I expect a little adjustment for such pieces. Not disappointed at all. I restore these cars for the challenge and if you can restore a 54 Ford F100 you can restore anything. Your store and these guys have made this rebuild a easy challenge. Ok. I admit, he welding I will have to do in the near future to make the trunk perfect is a bit more than I expected but again, nothing major. Anyway, anyone have a method for adjusting that rear molding that goes over the back of the package tray?
 
#18 ·
Hello. I am planning on buying the metal backseat to trunk divider from WCCC. My '67 XR7 is not torn down except for the rear seat and the interior quarter panels because I am replacing the window catwhiskers. I won't be able to weld the divider in, so what would be the next best option for mounting it? Screwing it from the interior side? That would leave a lot of screw tips visible from the trunk (not a good look). It would be neater looking to put the screws in from the trunk side and the screw tips would be hidden by the seat back. Could I just "glue" it on, using the 3M non-drying watershield compound, that is used in the doors? That wouldn't help body flexing, but neither does the stock tar-based divider. Another option might be using 3M automobile grade double sided foam tape (the black stuff).
I am also planning to add foil backed thermal mat on the interior side.
Opinions please.